COZMOの顔は、128×32ドットの有機ELモノクロディスプレイになっています。表情を表示する以外にも、任意の情報を表示することが可能です。
ということで、チュートリアル2つ目のカテゴリは、COZOMOの顔(有機ELディスプレイ)表示の制御です。
ひとつめのチュートリアル。/examples/tutorials/02_cozmo_face/01_cozmo_face_image.py は、画面にPNG画像の表示を行います。
プログラム最初に出てくるのは、ディスプレイが見えやすいように、顔の角度と腕の位置を調整する関数
def get_in_position(robot: cozmo.robot.Robot):
    '''If necessary, Move Cozmo's Head and Lift to make it easy to see Cozmo's face'''
    if (robot.lift_height.distance_mm > 45) or (robot.head_angle.degrees < 40):
        with robot.perform_off_charger():
            lift_action = robot.set_lift_height(0.0, in_parallel=True)
            head_action = robot.set_head_angle(cozmo.robot.MAX_HEAD_ANGLE,
                                                in_parallel=True)
            lift_action.wait_for_completed()
            head_action.wait_for_completed()
robot.lift_height.distance_mm で腕の高さ取得。robot.head_angle.degrees で顔の角度取得。
腕の高さが 45mmより高い、または、顔の角度が40度より下向きであれば、調整を行います。
with robot.perform_off_charger():
プログラム実行時、「cozmo.robot.Robot.drive_off_charger_on_connect = False」が指定してあると、COZMOは基本的にモーターを動かさなくなるのですが、上の指定をすると、そのブロックに限り、モーターの動作が可能になります。
lift_action = robot.set_lift_height(0.0, in_parallel=True)
head_action = robot.set_head_angle(cozmo.robot.MAX_HEAD_ANGLE,
                                                in_parallel=True)
腕の高さを0に、頭の角度を一番上(MAX_HEAD_ANGLE)に動かします。「in_parallel=True」を指定すると、並行して動作を行います。
lift_action.wait_for_completed()
head_action.wait_for_completed()
それぞれの動作が終了するまで待ちます。
次は画像表示のプログラム本体です。
def cozmo_program(robot: cozmo.robot.Robot):
    get_in_position(robot)
最初に先ほど定義したポジション合わせ関数を実行。
    # load some images and convert them for display cozmo's face
    image_settings = [("../../face_images/cozmosdk.png", Image.BICUBIC),
                      ("../../face_images/hello_world.png", Image.NEAREST)]
    face_images = []
    for image_name, resampling_mode in image_settings:
        image = Image.open(image_name)
        # resize to fit on Cozmo's face screen
        resized_image = image.resize(cozmo.oled_face.dimensions(), resampling_mode)

        # convert the image to the format used by the oled screen
        face_image = cozmo.oled_face.convert_image_to_screen_data(resized_image,
                                              invert_image=True)
        face_images.append(face_image)
イメージファイルの読み込み。読み込むイメージファイルは、以下の2つ。


それぞれのファイル名と、リサイズの方法(Image.BICUBIC / Image.NEAREST)を配列に設定して順に読み込み。
「image = Image.open(image_name) 」でファイルを開き、「resized_image = image.resize(cozmo.oled_face.dimensions(), resampling_mode)」で画像をCOZMOの顔の縦横サイズに変換します。
cozmo.oled_face.dimensions() では、COZMOの顔の縦横ピクセル数(128,32)が取得できます。
リサイズ後の画像データを、COZMOの顔データとして使えるように変換します。こちらが変換API。
cozmo.oled_face.convert_pixels_to_screen_data(pixel_data, image_width, image_height)
変換後のデータを face_images 配列に保持します。
次に表示処理。
# display each image on Cozmo's face for duration_s seconds (Note: this
# is clamped at 30 seconds max within the engine to prevent burn-in)
# repeat this num_loops times
画面表示は、有機ELの焼き付きを防ぐために、MAXで30秒にされるとのこと。
num_loops = 10
duration_s = 2.0
print("Press CTRL-C to quit (or wait %s seconds to complete)" % int(num_loops*duration_s) )
for _ in range(num_loops):
    for image in face_images:
        robot.display_oled_face_image(image, duration_s * 1000.0)
        time.sleep(duration_s)
「duration_s」の秒間隔で、「num_loops」で指定した回数繰り返します。
画面表示のAPIはこちら。
display_oled_face_image(screen_data, duration_ms, in_parallel=True)
http://cozmosdk.anki.com/docs/generated/cozmo.robot.html#cozmo.robot.Robot.display_oled_face_image
screen_data で指定したデータを、duration_ms ミリ秒の間表示します。duration_ms は、上にあるように焼き付き防止のため、30秒超えて指定しても内部で30秒にカットされます。
デフォルトで「n_parallel=True」なので次の処理になり、「time.sleep(duration_s) 」で指定した秒数を待ちます。
この繰り返しです。
# Cozmo is moved off his charger contacts by default at the start of any program.
# This is because not all motor movement is possible whilst drawing current from
# the charger. In cases where motor movement is not required, such as this example
# we can specify that Cozmo can stay on his charger at the start:
cozmo.robot.Robot.drive_off_charger_on_connect = False
「cozmo.robot.Robot.drive_off_charger_on_connect = False」の指定をすることで、COZMOはモーターを動かさないモードになります。
実行結果!
(長いので、表示回数は4回にしてます)
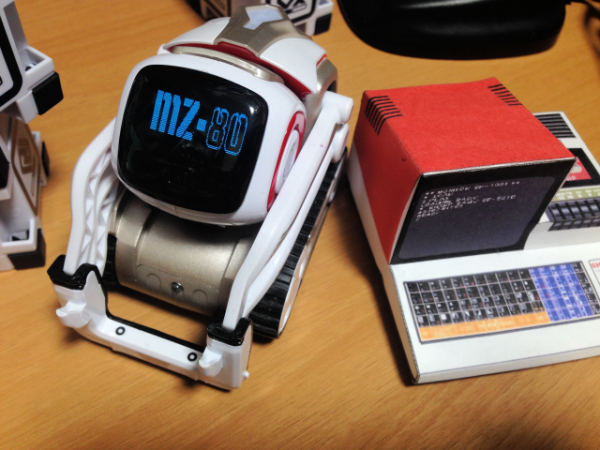
まもなく、PasocomMini MZ-80C が出荷になるとのことなので、MZ-80ロゴを表示してみます。
128×32の原寸でロゴ画像ファイル作成。表示!
ありゃん、なんか縦長になってしまった。ドットが正方形ではないのかな。
