デジタル時計は簡単に作れたので、次はアナログ時計を作りたい。
アナログ時計は、文字盤と針があればいける。文字盤はビットマップイメージを貼れればOKだろう。針は…グラフィックで線を描けばいいのかな?
とりあえず、線を引いてみたいので、グラフィック関連のAPIを確認する。
グラフィック関連のAPIは http://developer.getpebble.com/docs/c/Graphics/ このあたり。
線も引けるし円も書けるようですね。そしたら文字盤もこれで書いちゃっていいかもという感じです。
よし、やってみるか、と思ったのだけど、これまで出てこなかった「GContext」を取得する必要があるようです。TextLayerの時のように、単純に表示したいものをセットすればいい、というのとは少々異なっていそう。
むむ、「チュートリアル1をベースにしてtick_handlerで針を書けばいいんじゃないの?」程度に思ってたら、そんな簡単ではないようでした。
こういうときはサンプルプログラムを見てみましょう。
「PROJECT」の「CREATE」時に、テンプレートとしていろいろなサンプルプログラムが選択できます。
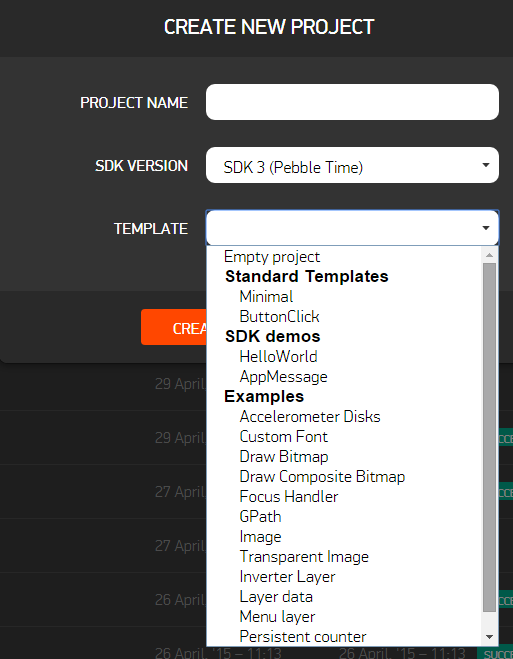
「Draw Bitmap」を選んでみました。
/*
 * The original source image is from:
 *   <http://openclipart.org/detail/26728/aiga-litter-disposal-by-anonymous>
 *
 * The source image was converted from an SVG into a RGB bitmap using
 * Inkscape. It has no transparency and uses only black and white as
 * colors.
 */

#include "pebble.h"

static Window *s_main_window;
static Layer *s_image_layer;
static GBitmap *s_image;

static void layer_update_callback(Layer *layer, GContext* ctx) {
  // We make sure the dimensions of the GRect to draw into
  // are equal to the size of the bitmap--otherwise the image
  // will automatically tile. Which might be what *you* want.

#ifdef PBL_PLATFORM_BASALT
  GSize image_size = gbitmap_get_bounds(s_image).size;
#else
  GSize image_size = s_image->bounds.size;
#endif

  graphics_draw_bitmap_in_rect(ctx, s_image, GRect(5, 5, image_size.w, image_size.h));
  graphics_draw_bitmap_in_rect(ctx, s_image, GRect(80, 60, image_size.w, image_size.h));
}

static void main_window_load(Window *window) {
  Layer *window_layer = window_get_root_layer(s_main_window);
  GRect bounds = layer_get_frame(window_layer);

  s_image_layer = layer_create(bounds);
  layer_set_update_proc(s_image_layer, layer_update_callback);
  layer_add_child(window_layer, s_image_layer);

  s_image = gbitmap_create_with_resource(RESOURCE_ID_IMAGE_NO_LITTER);
}

static void main_window_unload(Window *window) {
  gbitmap_destroy(s_image);
  layer_destroy(s_image_layer);
}

static void init() {
  s_main_window = window_create();
  window_set_window_handlers(s_main_window, (WindowHandlers) {
    .load = main_window_load,
    .unload = main_window_unload,
  });
  window_stack_push(s_main_window, true);
}

static void deinit() {
  window_destroy(s_main_window);
}

int main(void) {
  init();
  app_event_loop();
  deinit();
}
実行するとこんな。

コップの画像を2か所に描画します。プログラムを見ると、pngをリソースに登録してGBitmapに読み込むのはチュートリアル2と同じですが、描画方法が違ってますね。
BitmapLayerに画像を設定するのではなくて、Layerに対して「graphics_draw_bitmap_in_rect」を用いて描画をしているようです。
さらに、その描画処理も「layer_set_update_proc(s_image_layer, layer_update_callback)」
を設定してコールバックで呼び出している。
このように呼ばれると「static void layer_update_callback(Layer *layer, GContext* ctx) 」
で画像描画に必要なGContextの情報が手に入ると。なるほど…。
チュートリアル1のtick_handlerの処理的なことを、layer_set_update_procでやればよいわけですね。
GContextの取得ができそうなので、円でも描いてみましょう。円を描くAPIはgraphics_draw_circle です。
void graphics_draw_circle(GContext * ctx, GPoint p, uint16_t radius)
GContextに引数で渡ってきたctx を指定、GPoint で中心座標を指定、raduis で半径を指定です。こんなかんじかな。
//円を描く
graphics_draw_circle(ctx, GPoint(144 / 2,168 / 2), 50);
全体のプログラムは以下の通り。
#include <pebble.h>

static Window *s_main_window;
static Layer *s_image_layer;

static void layer_update_callback(Layer *layer, GContext* ctx) {
  //円を描く
  graphics_draw_circle(ctx, GPoint(144 / 2,168 / 2), 50);
}

static void main_window_load(Window *window) {
  Layer *window_layer = window_get_root_layer(s_main_window);
  GRect bounds = layer_get_frame(window_layer);
  s_image_layer = layer_create(bounds);
  layer_set_update_proc(s_image_layer, layer_update_callback);
  layer_add_child(window_layer, s_image_layer);
}

static void main_window_unload(Window *window) {
  layer_destroy(s_image_layer);
}

static void init() {
  // Create main Window element and assign to pointer
  s_main_window = window_create();

  // Set handlers to manage the elements inside the Window
  window_set_window_handlers(s_main_window, (WindowHandlers) {
    .load = main_window_load,
    .unload = main_window_unload
  });

  // Show the Window on the watch, with animated=true
  window_stack_push(s_main_window, true);
}

static void deinit() {
  // Destroy Window
   window_destroy(s_main_window);
}

int main(void) {
  init();
  app_event_loop();
  deinit();
}
さーて動くかなー。
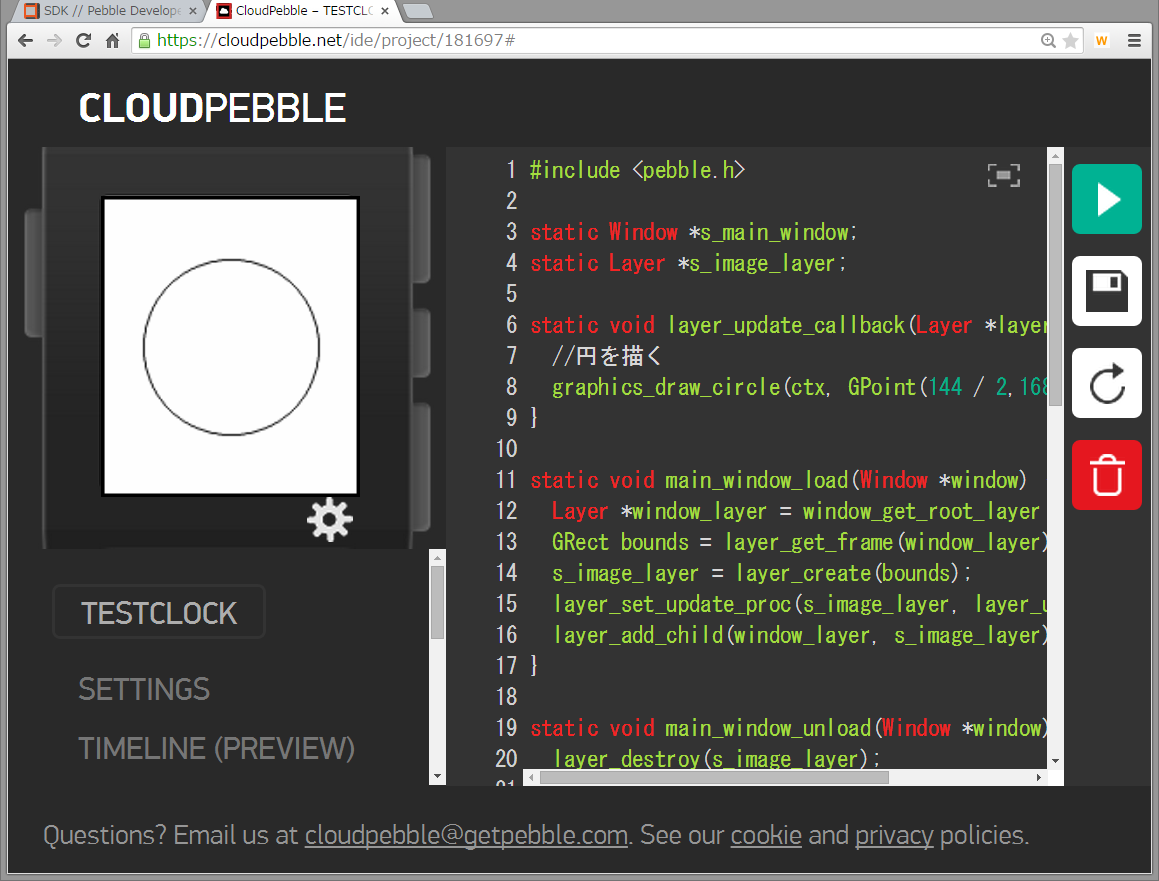
バッチリいけましたー。
プログラムですが、init() / deinit() / main(void) は チュートリアル1と同じです。やったことは、
1. グラフィック描画レイヤーの定義
static Layer *s_image_layer;
2. main_window_load でグラフィック描画レイヤーの作成
static void main_window_load(Window *window) {
  Layer *window_layer = window_get_root_layer(s_main_window);
  GRect bounds = layer_get_frame(window_layer);
  s_image_layer = layer_create(bounds);
  layer_set_update_proc(s_image_layer, layer_update_callback);
  layer_add_child(window_layer, s_image_layer);
}
(1) window_layerで画面全体のレイヤーを取得。
(2) その縦横サイズをboundsに取得。
(3) bounds のサイズに合わせて描画レイヤー s_image_layer を作成。
(4) s_image_layer のコールバック関数 layer_update_callback を設定。
(5) window_layer に 描画レイヤーs_image_layerを追加。
3. main_window_unload に s_image_layer 削除処理追加
static void main_window_unload(Window *window) {
  layer_destroy(s_image_layer);
}
4. コールバック処理作成
static void layer_update_callback(Layer *layer, GContext* ctx) {
  //円を描く
  graphics_draw_circle(ctx, GPoint(144 / 2,168 / 2), 50);
}
書いてみたら、わりかし簡単でしたね。
せっかくなので色も付けよう!
描画色は、graphics_context_set_stroke_color で設定します。
void graphics_context_set_stroke_color(GContext * ctx, GColor color)
ctxに対して、GColor 指定するだけですね。ちなみに塗りつぶす(fill)場合の色はgraphics_context_set_fill_color になります。
線の太さも設定しよう。太さは graphics_context_set_stroke_width です。(これはSDK 3のみ使えるようです。)
void graphics_context_set_stroke_width(GContext * ctx, uint8_t stroke_width)
これも太さ設定するだけですね。
static void layer_update_callback(Layer *layer, GContext* ctx) {
  //太さ10
  graphics_context_set_stroke_width(ctx,10);
  //色:赤 GColorRed
  graphics_context_set_stroke_color(ctx, GColorRed);
  //円を描く
  graphics_draw_circle(ctx, GPoint(144 / 2,168 / 2), 50);
  //色:緑 GColorGreen
  graphics_context_set_stroke_color(ctx, GColorGreen);
  //円を描く
  graphics_draw_circle(ctx, GPoint(144 / 2,168 / 2), 40);
}
これでどうだ。
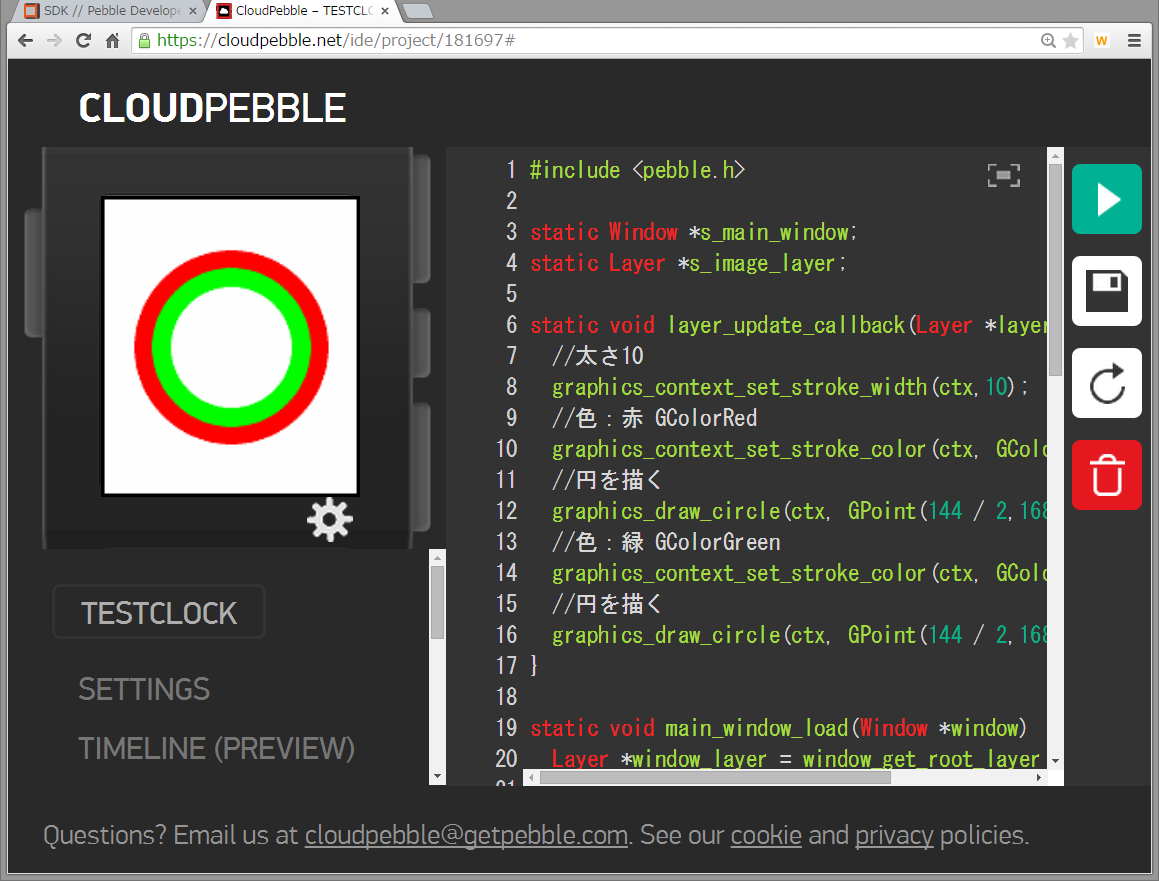
よいかんじですよ。
コールバックがいつ呼ばれてるのか気になるので、ログ入れてみた。
static void layer_update_callback(Layer *layer, GContext* ctx) {
  APP_LOG(APP_LOG_LEVEL_INFO, "Callback!!");
実行してみると
[INFO] ocess_manager.c:369: Heap Usage for App <TESTCLOCK>: Total Size <64904B> Used <164B> Still allocated <0B>
[INFO] main.c:7: Callback!!
1回だけ呼ばれてますね。layer_add_childの時かな?と思って
  APP_LOG(APP_LOG_LEVEL_INFO, "Before layer_add_child!!");
  layer_add_child(window_layer, s_image_layer);
  APP_LOG(APP_LOG_LEVEL_INFO, "After layer_add_child!!");
ログ入れてみたところ、
[INFO] main.c:25: Before layer_add_child!!
[INFO] main.c:27: After layer_add_child!!
[INFO] main.c:7: Callback!!
それより後でした。main_window_load 終了のタイミングっぽいですね。